

Discover Historic Downtown North Bend, WA—One Virtual Tour at a Time
August 11, 2025
Putting the Snoqualmie Valley on the Map: Our Special Virtual Tour Initiative
February 12, 2026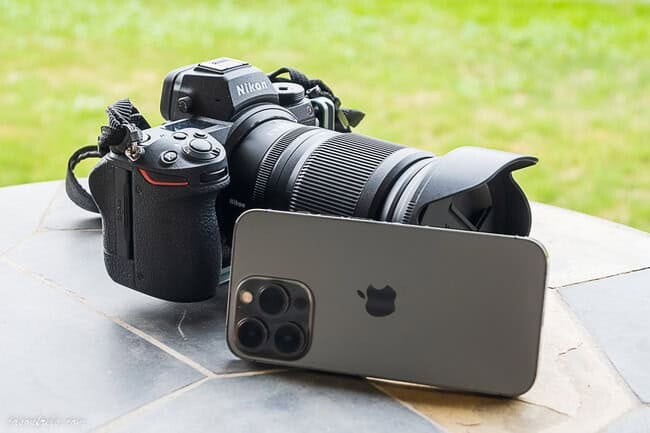
In the fast-paced world of real estate, first impressions aren’t just important—they’re everything. With buyers scrolling through listings at lightning speed, the quality of your property photos can mean the difference between a click and a pass. That begs the question: should you invest in professional photography, or can your iPhone do the job?
Let’s break down the pros, cons, and strategic implications of each approach.
The DIY iPhone Route: Convenience Meets Cost Savings (with a Pro Touch)
Smartphones have come a long way. With advanced lenses, HDR capabilities, and editing apps at your fingertips, it’s tempting to snap a few shots and call it a day. For agents or owners working with tight budgets or lower-priced listings, DIY photography offers:
- Accessibility: Your iPhone is always with you. No need to schedule a shoot or wait for edits.
- Cost Efficiency: Skip the photographer’s fee and allocate budget elsewhere.
- Speed: Capture, edit, and upload within hours—ideal for fast-moving markets.
- Hybrid Potential: You can shoot with your iPhone and outsource the editing to a professional. This bridges the gap between DIY and polished presentation, especially when budget constraints rule out a full-service shoot.
Professional post-processing can dramatically enhance DIY images by correcting exposure, sharpening details, adjusting color balance, and even simulating wide-angle perspectives. It’s a smart compromise for agents who want elevated visuals without the full cost of a shoot.
The Limitations of DIY
Even with professional editing, DIY photography has its limits:
- Lighting Challenges: Natural light varies wildly throughout the day. Without professional lighting gear, rooms can appear dark, uneven, or washed out.
- Lens Constraints: Wide-angle lenses are essential for showcasing space. iPhones simulate this, but distortion and cropping issues persist.
- Staging Blind Spots: Professionals know how to declutter, rearrange, and highlight focal points. DIY shots often miss these nuances, making rooms feel cramped or uninspired.
DIY photography may suffice for rental listings or budget properties, but it rarely elevates a space to its full potential—especially in competitive markets.
How to Take Great iPhone Photos for Real Estate
Capturing good real estate photos with an iPhone is absolutely possible—and when done right, it can get close to professional results. Here’s a step-by-step guide to help you shoot impactful images that elevate your listings, plus expert video tutorials to sharpen your technique.
1. Prep the Space Like a Pro
- Declutter and stage: Clean surfaces, remove personal items, and highlight focal points like fireplaces or large windows.
- Use symmetry and balance: Arrange furniture to guide the eye and create visual flow.
- Simple Tips for Amazing Real Estate Smart Phone Photos walks through staging basics and how to make rooms feel larger and more inviting.
2. Leverage Natural and Artificial Light
- Shoot during daylight: Open blinds and turn on all lights to eliminate shadows.
- Avoid mixed lighting: Stick to either daylight or warm bulbs to prevent color inconsistencies.
- How to shoot Real Estate Photography w/ the iPhone! explains how to balance lighting and avoid common exposure issues.
3. Use the Right iPhone Settings
- Enable HDR: This helps balance bright windows and darker interiors.
- Turn on the grid: Helps align shots and maintain straight lines.
- Lock focus and exposure: Tap and hold on your subject to prevent auto-adjustments mid-shot.
- How To Shoot Real Estate With An iPhone 15! shows how to optimize settings for crisp, well-lit images.
4. Master Composition
- Shoot from waist height: This gives a natural perspective and avoids ceiling-heavy frames.
- Capture two walls: Adds depth and context to the room.
- Use wide-angle mode: Essential for showcasing space, especially in tight rooms.
5. Stabilize Your Shots
- Use a tripod: Prevents blur and ensures consistent framing.
- Try the self-timer: Avoids camera shake when tapping the shutter.
- Shoot PROFESSIONAL Property Tours Like a Pro with Just an … highlights gear like gimbals and tripods for smooth, professional-looking walkthroughs.
6. Edit Like a Professional
- Use Lightroom Mobile or Snapseed: Adjust brightness, contrast, and white balance.
- Enhance skies and shadows: Make rooms pop without over-editing.
- Consider outsourcing edits: Services like BoxBrownie can elevate your DIY shots.
- How to Edit Real Estate Photos Taken on iPhone (tutorial) walks through a full editing workflow to polish your images for listing-ready quality.
7. Plan Your Shot List
Include: front exterior, entryway, living room, kitchen, bathrooms, bedrooms, backyard, and any standout amenities.
How to Shoot Real Estate Photography with an iPhone covers how to structure your shoot and avoid amateur mistakes
Professional Photography: The Strategic Advantage
Hiring a seasoned real estate photographer is more than a luxury—it’s a strategic investment. Here’s why:
- Visual Storytelling: Pros understand how to capture the lifestyle your property offers. From cozy reading nooks to sun-drenched patios, they frame each shot to evoke emotion and aspiration.
- Technical Mastery: High-end cameras, tripods, lighting rigs, and editing suites allow for crisp, vibrant, and distortion-free images.
- Consistency: Whether it’s a luxury condo or a suburban family home, professional photos maintain a cohesive visual style across listings—building brand trust and recognition.
- Time Savings: While the shoot may take a few hours, the payoff is immense. You’re free to focus on negotiations, client relations, and marketing while your photographer handles the visuals.
And let’s not forget the bottom line: listings with professional photos sell faster and often at higher prices.
Case in Point: The Impact on Buyer Psychology
Imagine two listings for similar properties. One features dimly lit, uneven iPhone shots. The other showcases professionally staged, well-lit images with perfect angles. Which one feels more valuable? Which one sparks curiosity and urgency?
Professional photography doesn’t just show a space—it sells a lifestyle. It invites buyers to imagine themselves living there, entertaining guests, or working from a sunlit home office. That emotional connection is what drives action.
Strategic Takeaways for Agents and Sellers
- Know Your Audience: High-end buyers expect high-end visuals. Don’t cut corners on million-dollar listings.
- Use DIY Wisely: For quick rentals or low-margin flips, iPhone shots may suffice—but only if you understand basic composition and lighting.
- Hybrid Approach: Consider using DIY for teaser content or social media, then elevate those images with professional editing for MLS listings and brochures.
- Brand Consistency: If you’re building a reputation as a premium agent or developer, professional photography reinforces your brand promise.
Final Verdict: Invest Where It Counts
In today’s competitive market, visuals are your silent salespeople. They work 24/7, drawing in buyers and setting expectations before a single showing. While DIY photography offers convenience, it rarely delivers the polish and persuasion needed to stand out.
Professional photography, on the other hand, is a strategic tool—one that transforms listings into experiences and browsers into buyers.
So, whether you’re marketing a sleek urban loft or a sprawling countryside estate, ask yourself: are your photos doing the property justice?


